
Migrating Joomla from shared hosting to an unmanaged VPS#
Published by Fayçal Alami-Hassani @gnufcl@fosstodon.org

Picture by Stéphane Wootha Richard under CC BY-SA 4.0 License#
Migrating a website from a shared hosting plan to an unmanaged VPS might seem a daunting task at the beginning. Depending on your acquaintance with server administration, it may take you a few days to several weeks to gather all the relevant information and organize the required steps in a structured, logical way to set up a custom migration project.
There are plenty of resources about the topic, both online and offline. However, most of them only describe a tiny part of the entire process.
The biggest challenges that you might face when migrating from shared hosting to an unmanaged VPS are related to the following topics:
Software stack to use, i.e. operating system, database technology, web server, and programming language.
Backup, data transfer, and restore strategy.
Choosing between server administration with the Linux command line (CLI) or GUI-based hosting panels such as cPanel, Plesk, and Froxlor.
User permission management.
DNS settings and configuration.
Testing the website before the actual domain transfer.
SSL certificate management.
In this tutorial, you will learn how to migrate a Joomla website from a shared hosting provider to an unmanaged VPS server.
Note
When we talk about virtual private servers (VPS), we distinguish between two main categories: managed vs. unmanaged VPS. Put in a few words, An unmanaged VPS plan gives you full control over the technical aspects of your server management and administration. There is no technical support to resolve issues and you are responsible for maintaining your server, including the installation of patches and updates, among other things.
Prerequisites#
This tutorial assumes that you already have the following:
LAMP stack installed on your VPS server. LAMP is short for “Linux + Apache + MySQL + PHP”.
Non-root user with sudo privileges on your VPS server.
SSH access to your VPS server.
Before you follow this guide, make sure to configure your environment accordingly.
Performing the backup on your shared hosting account#
To backup your website files and the corresponding database, follow these steps:
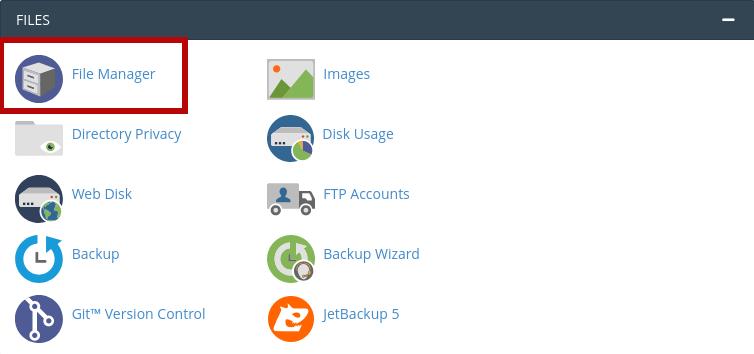
Login to your shared hosting account.
In your cPanel, go to File Manager > public_html.
Inside the public_html directory, check your database login credentials in the file ‘configuration.php’. You should look for the following entries:
public $user: Database user namepublic $password: Database passwordpublic $db: Database namepublic $dbprefix: Database prefix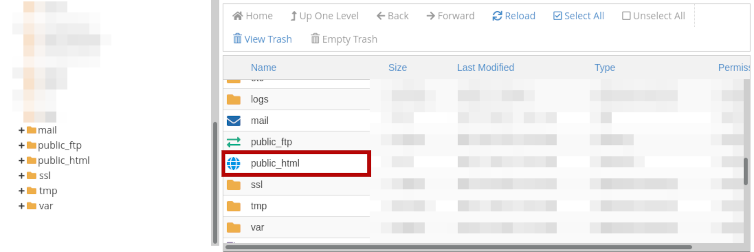
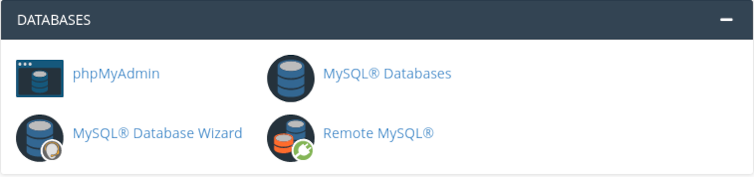
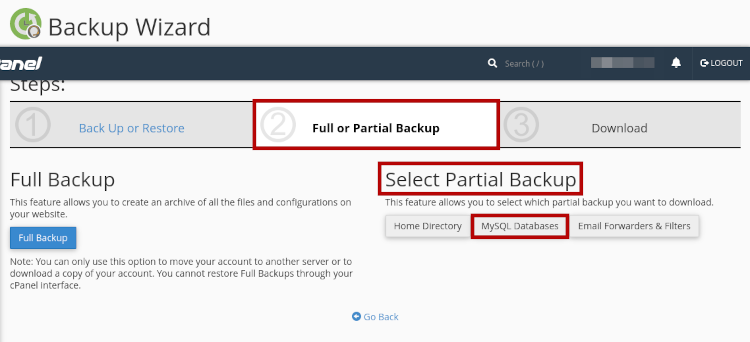
In the cPanel main menu, go to Backup > Databases > MySQL® Database Wizard.
The Backup Wizard provides multiple options. Select Full or Partial Backup > Select Partial Backup > MySQL Databases. This will allow you to download a backup of the MySQL database(s) of your Joomla website to your local machine.
Login to the backend of your Joomla website.

To backup the website files, we will use an extension called Akeeba Backup.
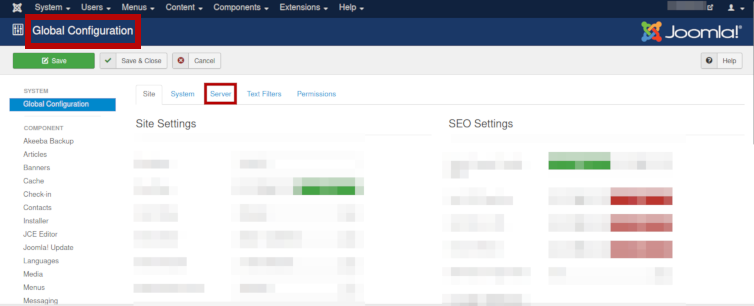
Before making a backup with akeeba, make sure to disable SSL. To do so, navigate to System > Global Configuration > Server > Force HTTPS. Select the option None from the drop-down menu.
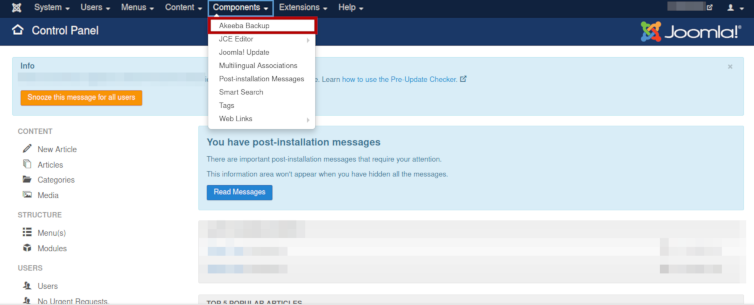
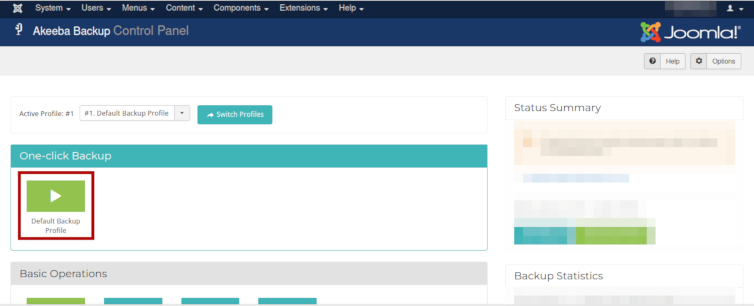
Next, go to Components > Akeeba Backup > One-Click Backup > Default Backup Profile
Once the backup process has completed, click on the “i” button below the green “Download” button on the right to display your “Backup Archive Information”.
Note
An Akeeba backup file has a
.jpaextension.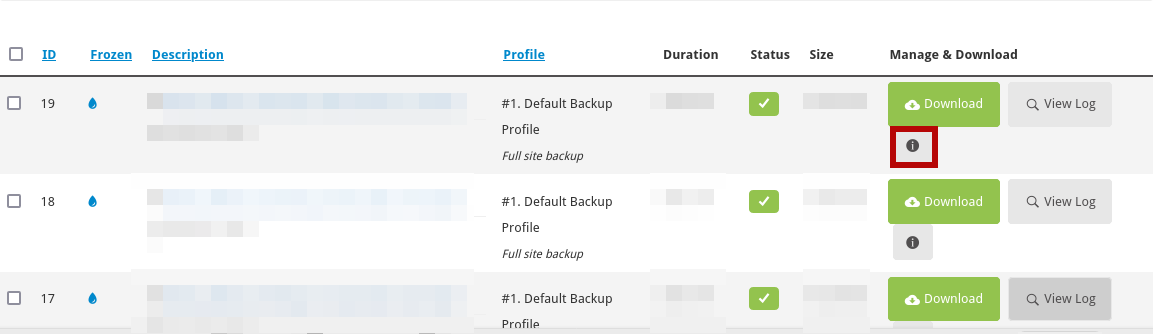
In your shared hosting account, navigate to the location of your Akeeba backup file through File Manager > public_html > path-to-akeeba-backup. Download the .jpa file to your local machine.
Now that you have downloaded your backup file, you need to re-enable SSL for your entire website. On your shared hosting account, navigate to the folder
public_htmland open the file “configuration.php”.Search for the entry
public $force_ssland switch the value from 0 to 2:public $force_ssl = 2Save your changes and return to your Joomla Backend. Go to System > Global Configuration > Server.
Navigate to the option Force HTTPS and select Entire Site from the drop-down menu.
Download the Akeeba Kickstart Core by clicking on the button Download Core.
In the next page that will open, click on the green button Download Core v.xxx, where xxx refers to the current version number. This will download a .zip file containing the file
kickstart.php. We will place this php file in the root of our site to restore the Joomla backup.


Preparing your new VPS server to host your website#

“Spacedog Repairman” by Katharsisdrill under CC BY 4.0 License#
You need to test your website on the new VPS before performing the actual domain transfer from your shared hosting to the new VPS.
Option 1: Adding an entry to your hosts file#
On linux systems, the /etc/hosts file maps hostnames to IP addresses.
To edit the hosts file on your system, type the following command:
$ sudo nano /etc/hosts
Add the following lines to the bottom of the hosts file:
1IP_address_of_your_VPS  domainname.com
2IP_address_of_your_VPS  www.domainname.com
Replace domainname.com by your actual domain name, then press Ctrl + O to save your changes and Ctrl + X to close the nano editor.
Clearing the DNS cache after updating your hosts file#
Note
On some Linux systems, you may need to flush the DNS cache in order to update the domain resolution to the new IP address. On Debian-based distros, caching DNS queries is performed with the systemd-resolved daemon.
To find out if systemd-resolved is running on your system, type the following command in your terminal:
$ sudo systemctl is-active systemd-resolved
If the output shows the status active, it means that the daemon is up and running.
To clear the DNS cache, run the following command:
$ sudo systemd-resolve --flush-caches
You can now check the cache size with the command:
$ sudo systemd-resolve --statistics
The entry Current Cache Size: 0 will appear in the output if the DNS cache has been cleared successfully.
Option 2: Adjusting the DNS records#
For testing purposes, you can create a DNS Zone for your domain on the new VPS server. The DNS Zone section allows you to configure your domain for the different services that you intend to provide.
Suppose that you already have a domain that is registered with another service provider. To avoid any service interruptions before transferring your domain to a new provider, you can add a DNS zone before you begin the domain name transfer process.
Warning
Make sure to configure the DNS servers accordingly to take the DNS zone into account.
Adding a DNS Zone generally involves the following steps:
Entering a domain name in the
DNS ZonesectionChoosing whether you want to enable minimal records, the default is
NoChecking the pricing details
Confirming the Special Terms for the Webdomain and the General terms of service
Login to your shared hosting account.
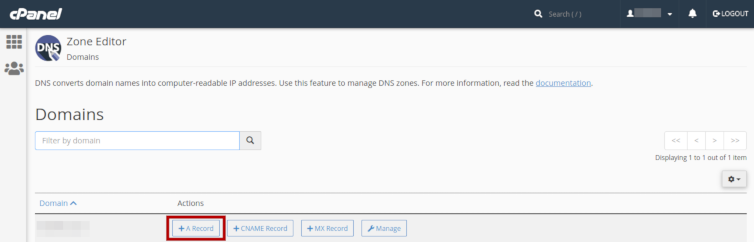
In your cPanel, go to Domains > Zone Editor.
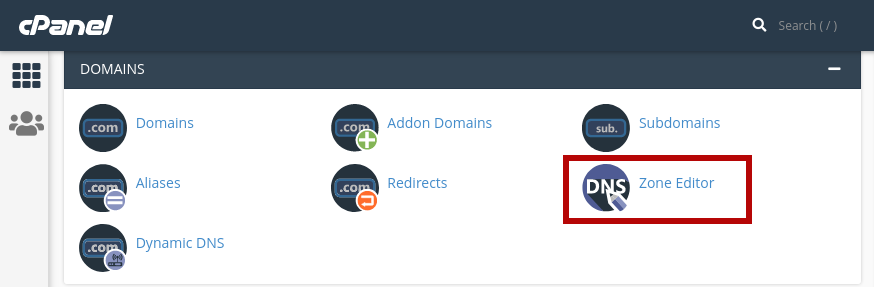
In your Zone Editor, go to Actions, then select the tab +A Record. A new window with the title Add an A Record for “yourdomain.com” will open.
In the Name field, enter your fully-qualified domain name (FQDN) by appending a dot at the end of your domain name:
joomla-domain.com..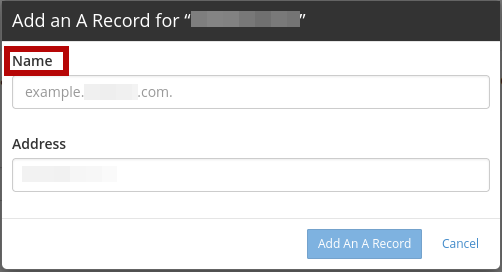
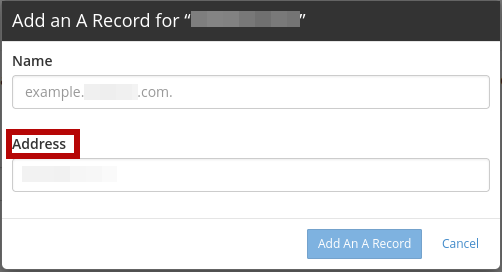
In the Address field, enter the IP address of your new Virtual Private Server (VPS). Remember that you want the DNS server from your shared hosting plan to point to your new VPS. By doing so, you can test if everything is working fine before requesting a domain transfer.


Uploading the required files to your VPS server#
To restore the Joomla website on your new VPS server, you will need these three files:
The Akeeba backup file with the
.jpaextensionThe SQL dump file that we have generated with the Backup Wizard in cPanel
The
kickstart.phpfile that we have extracted from the Akeeba Kickstart Core
To upload each of these files to your VPS server via ssh, use the scp command as shown below:
$ scp -P PORT-NUMBER /PATH/TO/FILE USER@IP-ADDRESS:PATH/TO/DESIRED/DESTINATION
Replace the parameters of the scp command by their actual values, i.e.:
Parameter |
Description |
|---|---|
PORT-NUMBER |
the port number your are using to connect to your VPS server through ssh. The default port number for ssh connections is 22, but you can set a different port number for your ssh connection. |
/PATH/TO/FILE |
the path to the file that you want to upload to your VPS server |
USER |
The active ssh user. You will find all your ssh credentials in the corresponding section on your customer page. If stil doubt, contact your VPS provider. |
IP-ADDRESS |
The IP address of your VPS server |
Creating an empty MySQL database#
In the section Performing the backup on your shared hosting account, you made a backup of your MySQL database. You will now create an empty database on your VPS to import the SQL dump file.
Login to MySQL by typing the following command in your VPS terminal:
$ mysql -u root -p
Once you enter your password, you will get access to the MySQL shell prompt. Now, you will create a new database with the following command:
mysql> CREATE DATABASE new_database;
Note
You can replace the value new_database by a name that suits your needs. When choosing a name for your MySQL database, follow these naming convention rules:
Use lowercase
Use only alphabetical characters
Do not use numeric characters
Avoid using prefixes
Give your database a self-explanatory name
If everything went fine, the shell prompt will display the following output:
1Output
2Query OK, 1 row affected (0.00 sec)
Importing the SQL dump into your new database#
We will now assign a user bob to our newly created database by typing the command below. Make sure to change the username bob and the deafult password to a strong password of your own:
mysql> CREATE USER 'bob'@'localhost' IDENTIFIED BY 'password';
Use the key combination Ctrl + D to leave the MySQL shell prompt.
In the VPS terminal, you can now import the SQL dump file with the following command:
$ mysql -u 'username' -p 'new_database' < 'data-dump.sql'
Setting up a virtual host on your VPS#
At the beginning of this guide, we mentioned in the Requirements section that we will use Apache as a web server in our stack. Apache allows you to configure multiple virtual hosts, making it possible to host more than one domain on a single server.
In our particular scenario, this means that we can host all the following domains on our VPS, as long we have sufficient storage, RAM, CPU, and IOPS resources:
techwriting-website.com
webdev-website.net
infosec-website.org
etc.
Before you set up a virtual host, make sure that Apache is up and running on your VPS. To do so, type the following command:
$ sudo systemctl start apache2
To start the Apache2 server automatically on boot, use the following command:
$ sudo systemctl enable apache2
From now on, you will have to create a dedicated folder under
/var/wwwfor each new domain that you want to host on your VPS. For instance, to create the domain that will host your Joomla backup on the new VPS, type the following command:$ sudo mkdir /var/www/joomla-domain
Replace the parameter
joomla-domainby the actual domain name that your are using for your Joomla website.Assign ownership of the newly created directory with the
$USERenvironment variable by using the command below. The$USERenvironment variable is identical to the$LOGNAMEenvironment variable, which represents the currently logged-in user:$ sudo chown -R $USER:$USER /var/www/joomla-domain
Make sure that you granted the correct web root permissions by typing the command below. The folder’s owner should have read/write/execute permissions, while group and others should only have read/execute privileges.
$ sudo chmod -R 755 /var/www/joomla-domain
Note
The default permissions on a web server are 755 for directories and 644 for files.
In order for Apache to serve your content, you need to create an “Apache virtual host configuration file”. To do so, we will create a new empty file with the nano editor:
$ sudo nano /etc/apache2/sites-available/joomla-domain.conf
Put the following directives inside the configuration file:
1<VirtualHost *:80>
2ServerAdmin webadmin@localhost
3ServerName joomla-domain
4ServerAlias www.joomla-domain
5DocumentRoot /var/www/joomla-domain
6ErrorLog ${APACHE_LOG_DIR}/error.log
7CustomLog ${APACHE_LOG_DIR}/access.log combined
8</VirtualHost>
Note
The email provided in the field ServerAdmin[2] is a placeholder. Make sure to use a working email address where the administrator of your Joomla domain can receive notifications. Also replace the parameters
joomla-domain[3] andwww.joomla-domain[4] by the actual domain name of your Joomla website.Once you have entered the relevant information, press
Ctrl + Oto save your changes andCtrl + Xto close the nano editor.We will now use a sample
index.htmlfile to check if our virtual host is working properly. To do so, we will create a new empty file with the nano editor:$ sudo nano /var/www/joomla-domain/index.html
Add the following lines in the empty file:
1<html>
2  <head>
3        <title>Welcome to my joomla-domain</title>
4  </head>
5  <body>
6        <h1>The joomla-domain virtual host is up and running</h1>
7  </body>
8</html>
a2ensite is a script that allows you to enable a specific site within the Apache2 configuration. This is achieved by creating symlinks (short for symbolic links) within the
/etc/apache2/sites-enableddirectory.We will use a2ensite to enable our newly created site on the VPS. To do so, type the command:
$ sudo a2ensite joomla-domain.conf
In the same manner that a2ensite adds symbolic links to enable a specific site, a2dissite removes symbolic links to disable a site.
In our particular case, we will use a2dissite to disable the default configuration file called
000-default.conf.This default file is a fallback for all the requests that do not specify a configuration file.
To disable the default configuration file, type the following command:
$ sudo a2dissite 000-default.conf
Make sure that your configuration does not contain any erros by running the following command:
$ sudo apache2ctl configtest
If everything is fine, you should get the following output:
1Output
2Syntax OK
Each time you modify the Apache configuration, you need to restart the Apache service. Use the following command to restart Apache:
$ sudo systemctl restart apache2
To check that the web server is serving your content now, go to
http://joomla-domainin your browser. You should see the following output:The joomla-domain virtual host is up and running
Restoring your Joomla website on the VPS#
To restore your Joomla website on the VPS server, you first have to move the file kickstart.php and your Akeeba backup file backup-file.jpa to the root of your site on the VPS, i.e. inside the folder /var/www/joomla-domain.
If you have not already placed both files in the root of your Joomla site, open the terminal, then navigate to the folder containing both files. Next, type the following commands:
1$ sudo mv kickstart.php /var/www/joomla-domain
2$ sudo mv backup-file.jpa /var/www/joomla-domain
Replace the parameter
backup-file.jpaby the actual backup file name.In your browser, type the following address:
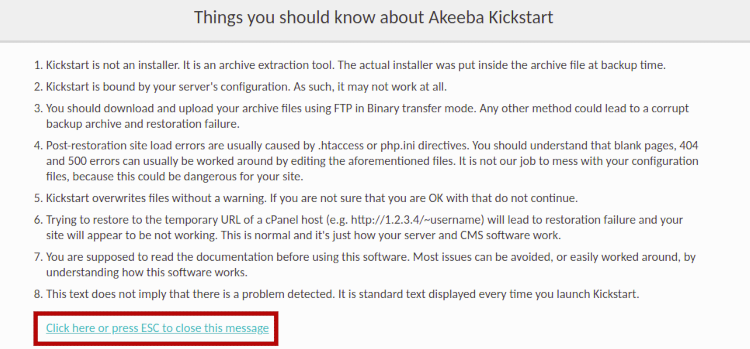
http://joomla-domain/kickstart.phpThe welcome screen of Akeeba Kickstart appears. Press the button Click here or press ESC to close this message on the bottom left.
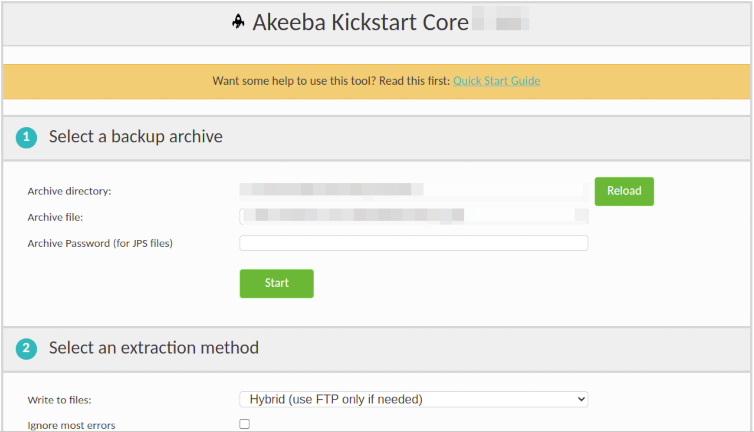
The graphical interface of the Akeeba archive extraction tool will appear on your browser screen.
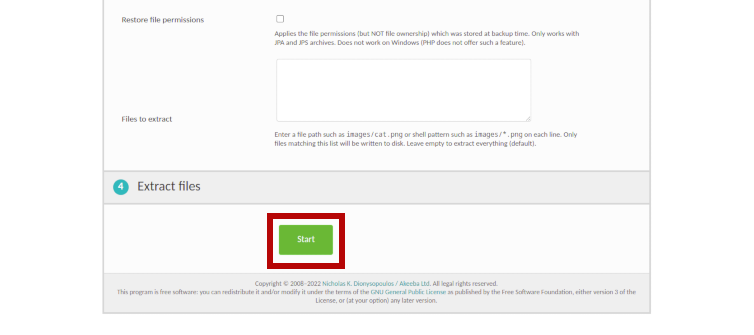
Scroll to the bottom of the screen, then click on the Start green button under the section Extract files.
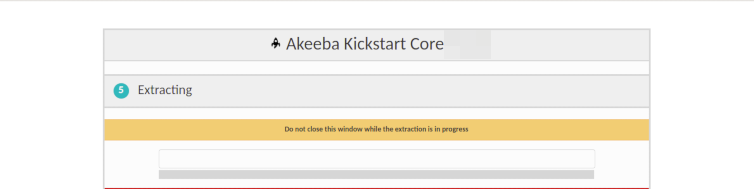
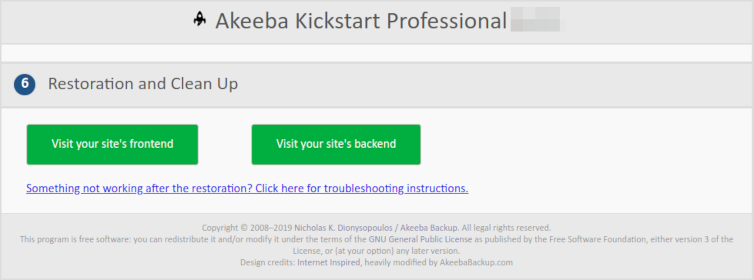
The extraction progress window will appear. Once the files are extracted, click on the green button Run the Installer under Restoration and Cleanup
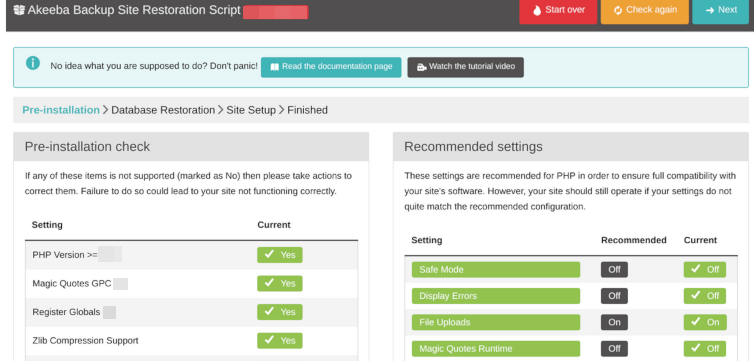
The site restoration script of Akeeba Backup will perform a pre-installation check. This allows you to take the necessary actions to correct any possible issues. If everything is fine, press the button → Next on the top right side of the screen.
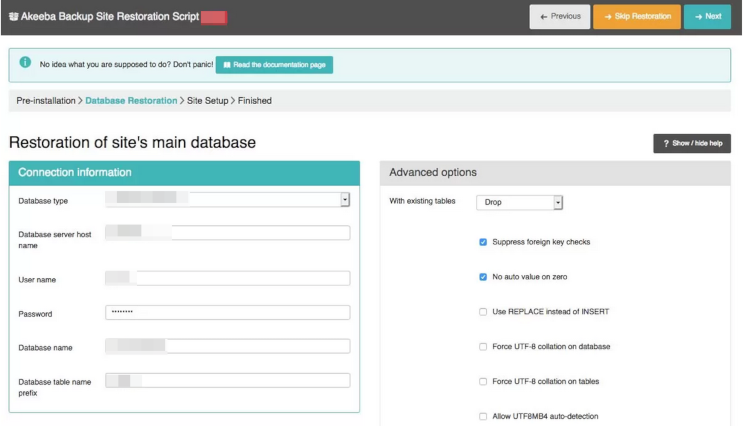
In the screen that appears, enter the credentials for the MySQL database that you have created. Once you have entered all the required information, click on the button → Next on the top right side of the screen.
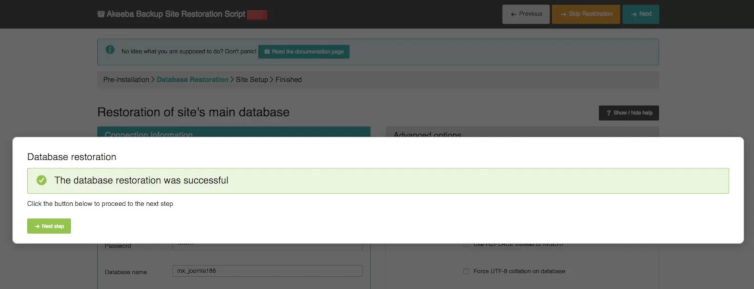
A Database Restoration Progress Bar will appear. If the restoration was successful, you wil see the message: The database restoration was successful.
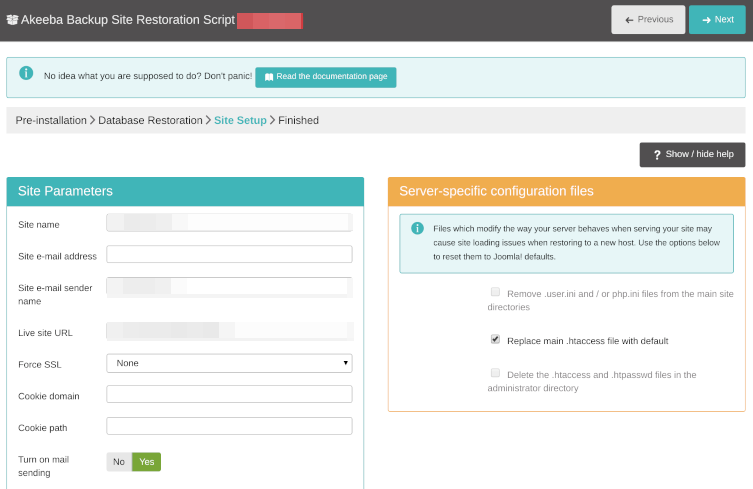
In the screen that appears, enter the site parameters such as “Site name” and “Live site URL”. Once you have entered all the required information, click on the button → Next on the top right side of the screen.
If the restoration process has completed successfully, you will see the creen below. You can now visit you site’s frontend or login to the site’s backend.


Installing Let’s Encrypt certificates with Certbot#
Now that you have restored your Joomla website, remember that you had to disable SSL before making the backup with Akeeba. To protect your website, you can install TLS/SSL certificates from Let’s Encrypt.
Let’s Encrypt is a non-profit and open certificate authority managed by the Internet Security Research Group, a public-benefit corporation based in California.
To issue the TLS/SSL certificates and install them automatically on the web server, we are going to use Certbot, an open-source software developed by the Electronic Frontier Foundation.

Picture by the Electronic Frontier Foundation under CC BY 2.0 License#
Note
Before you follow the instructions below, make sure HTTPS traffic is allowed by your firewall. The default port number for HTTPS traffic is 443.
In your terminal, run the following command to install Certbot with the plugin that allows the integration with the Apache web server:
$ sudo apt install certbot python3-certbot-apache
Press
Y, thenEnterto run the installation.To issue a certificate and reconfigure apache automatically, run the command:
$ sudo certbot --apache
Carefully read the questions that will appear on your terminal. Provide a valid email address.
Agree to the “Terms of Service” by pressing
A(short for Agree).Choose whether you want to share your email address with the Electronic Frontier Foundation by pressing
Yto confirm orNto refuse.You will then get the output shown below. Indicate the domains that you want to enable HTTPS for by selecting the appropriate listed numbers:
Plugins selected: Authenticator apache, Installer apache

Which names would you like to activate HTTPS for?
- - - - - - - - - - - - - - - - - - - - - - - - - - - - - - - - - - - - - - - -
1: joomla-domain.com
2: www.joomla-domain.com
- - - - - - - - - - - - - - - - - - - - - - - - - - - - - - - - - - - - - - - -
Select the appropriate numbers separated by commas and/or spaces, or leave input
blank to select all options shown (Enter 'c' to cancel): c
Please specify --domains, or --installer that will help in domain names autodiscovery, or --cert-name for an existing certificate name.
In the next prompt that appears, choose whether or not you want to force redirecting HTTP to HTTPS traffic.
Please choose whether or not to redirect HTTP traffic to HTTPS, removing HTTP access.
- - - - - - - - - - - - - - - - - - - - - - - - - - - - - - - - - - - - - - - -
1: No redirect - Make no further changes to the webserver configuration.
2: Redirect - Make all requests redirect to secure HTTPS access. Choose this for
new sites, or if you're confident your site works on HTTPS. You can undo this
change by editing your web server's configuration.
- - - - - - - - - - - - - - - - - - - - - - - - - - - - - - - - - - - - - - - -
Select the appropriate number [1-2] then [enter] (press 'c' to cancel):
Once you have answered all the questions, Certbot will start the installation.
If the installation was successful, you will get the following output:
- - - - - - - - - - - - - - - - - - - - - - - - - - - - - - - - - - - - - - - -
Congratulations! You have successfully enabled https://www.joomla-domain.com

You should test your configuration at:
https://www.ssllabs.com/ssltest/analyze.html?d=www.joomla-domain.com
- - - - - - - - - - - - - - - - - - - - - - - - - - - - - - - - - - - - - - - -

IMPORTANT NOTES:
 - Congratulations! Your certificate and chain have been saved at:
   /etc/letsencrypt/live/www.joomla-domain.com/fullchain.pem
   Your key file has been saved at:
   /etc/letsencrypt/live/www.joomla-domain.com/privkey.pem
   Your cert will expire on 2022-10-25. To obtain a new or tweaked
   version of this certificate in the future, simply run certbot again
   with the "certonly" option. To non-interactively renew *all* of
   your certificates, run "certbot renew"
 - If you like Certbot, please consider supporting our work by:

   Donating to ISRG / Let's Encrypt:   https://letsencrypt.org/donate
   Donating to EFF:                    https://eff.org/donate-le
Certbot has now installed your TLS/SSL certificate and configured Apache accordingly.